Sales & CRM guide
Switch to the Sales suite
Sales tools live in their own suite, separate from Construction. Use the icon rail on the left edge of the screen to switch to Sales. The sidebar changes to show Dashboard, Projects, All Customers, and All Deals.
The Sales dashboard shows open deals, follow-ups due, amount booked this month, and available units, plus a recent-deals list and a pipeline-by-stage breakdown.

Tip: Pick a project from the project switcher first if you want project-scoped lists: Overview, Inventory, Customers, Deals, Follow-ups, Payments, and Settings for that one development. Org-wide All Customers / All Deals show everything across every project you have access to.
Finding and adding customers
- All Customers (org-wide) lists every customer across your projects, with search and filters by project, status, and type. Switch between table and card view.
- A project's own Customers page shows just the customers linked to that project.
- Open any row to see the customer's profile: contact details, budget range, and their linked deals.
A project's Customers page has its own Add Customer button, so you can create a buyer record directly without opening a deal first. The org-wide All Customers list has no create button. Customers there always belong to a project.
You can also create a customer from the deal-creation flow. When you go to start a deal and the buyer you need doesn't exist yet, an Add a customer prompt takes you to a customer form. Once saved, you're returned to the deal form with that customer preselected as the buyer.
Note: Whether you can see or manage customers depends on your role's permissions. If your account only has deal access without customer access, the buyer field on new deals will be unavailable until an admin grants it. See Roles & permissions.
Creating a deal (recording buyer interest)
A deal always starts from an available unit, not from a blank form:
- From the Sales dashboard or a project's Inventory page, click Add buyer interest.
- In the picker, filter by phase, building, or bedroom count, and search by unit number. Only units marked Available are listed.
- Click Add buyer interest next to the unit you want. This opens the Create Deal form for that unit, which only records an interested buyer against the unit. Booking is a separate, later step in the deal's lifecycle (see Moving a deal through its stages).
- On the form, select the buyer (an existing customer, or add one inline if needed), set the final price, and set the deal's starting stage (new deals start at Enquiry by default). As soon as you enter a price, a live tax estimate appears showing stamp duty and GST for that buyer and unit.
- Save to create the deal. You're taken to the deal's detail page.
Note: A unit already held by another deal (Booked or further along) can't take a new one. The Add buyer interest button is disabled with the specific reason (held, sold, or already booked) until that deal is cancelled or the sale falls through.
Working a deal
Each deal has its own page with five tabs: Overview, Activity, Follow-ups, Payments, and Changes.
- Overview shows your next follow-up and days since last contact while a deal is still open (Enquiry, Negotiation, On hold). Once a deal is booked, it switches to the payment summary instead.
- Activity is a timeline of notes, calls, and status changes logged against the deal.
- Follow-ups holds tasks and reminders tied to the deal, with due dates.
- Payments and Changes carry the deal's payment schedule and its receipt and audit history (see below).
Moving a deal through its stages
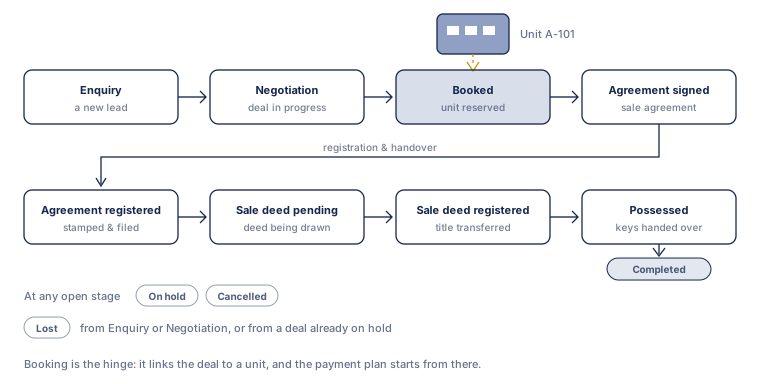
A deal moves through a fixed sequence of stages, and Construvex only allows the next logical move. You can't skip ahead:
Enquiry → Negotiation → Booked → Agreement signed → Agreement registered → Sale deed pending → Sale deed registered → Possessed → Completed
On hold and Cancelled are available from any stage that isn't already closed. Lost is narrower: you can't set it directly once a deal is Booked or further along. You can set it from Enquiry or Negotiation, or from On hold, so a booked sale that falls through is put on hold first and then marked Lost. Once cancelled or lost, a deal is closed and won't move again.
A deal paused before Booked can come back to Enquiry, Negotiation, or Booked. A deal that already held its unit's booking (paused from Booked or any later stage) can only resume to that exact stage, or be cancelled or marked Lost. That keeps a paused deal from silently losing the progress it had already made.
The stages after Booked track the legal paperwork for the sale: agreement, registration, sale deed, and possession. Together they give you a running record of where each buyer stands in that process.
Warning: Cancelling or marking a deal Lost is final in the app's workflow; the deal's status can't move forward again afterward. Existing payment receipts stay visible for reference, but no new payments or triggers are allowed on a cancelled or lost deal.
Follow-ups
Follow-ups are dated reminders against a deal. From a deal's Follow-ups tab, or the project-wide Follow-ups page, you can see tasks due today, this week, or overdue, filter between your own follow-ups and your whole team's, and mark them complete.
From booking to payment plan
Once a deal reaches Booked, its Payments tab is where collections happen:
- If no payment schedule exists yet, you'll see a prompt to generate a schedule from one of your organization's payment-plan templates.
- The generated schedule breaks the total price into milestones, for example a booking amount plus installments tied to construction progress. Each milestone shows its amount, due status, and whether it's been paid.
- As payments come in, they're recorded as receipts against specific milestones, and the deal's payment status and progress bar update automatically.
- The Changes tab keeps the full record of receipts and payment-related activity for audit purposes.
Because schedules are driven by construction milestones, due amounts become payable as construction actually progresses on the ground, not on a fixed calendar. For the full picture of payment plans, milestone triggers, and recording receipts, see the Payments & collections guide.
Core concepts
The hierarchy, customers and deals that every other part of Construvex is built on, and how they connect to each other.
Construction progress guide
Track real construction work, from setting up activities to seeing roll-up percentages at every level of the Project → Phase → Building → Unit hierarchy.